

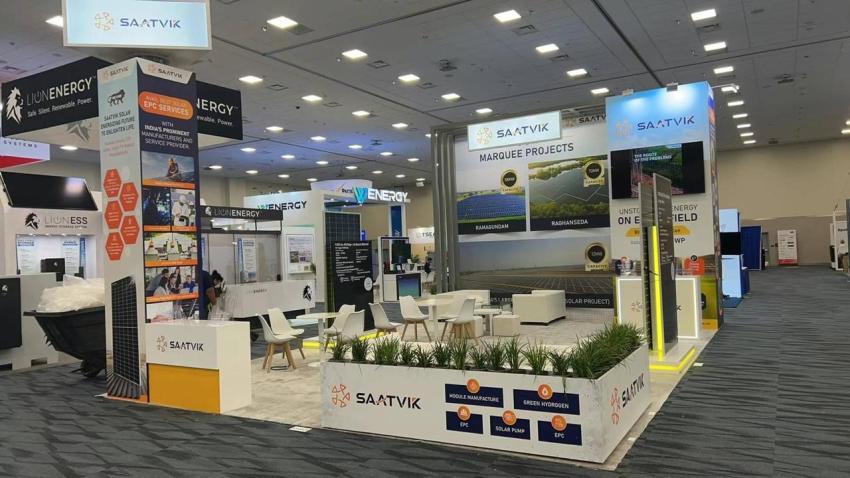
You have the floor space, the products and the team. What you do not have is a local presence. Your headquarters is thousands of miles away, your time zone is 8, 10 or 12 hours off, and your booth is about to be built, installed and dismantled by people you have never met, in a venue you have never visited.
For international exhibitors, a US trade show is a high-reward, high-complexity project. And when the space is a 20x40 island, 800 square feet open on all sides, the complexity multiplies. More structure, more graphics, more services, more labor and more decisions, all managed across borders.
The good news is that this challenge is manageable. Exhibitors who build a clear system for working with local vendors consistently arrive on time, on budget and on brand. This guide shows you how.
Why a 20x40 Island Is Different
A 20x40 trade show booth is large enough to function as a complete environment. It usually needs an attraction zone, product display areas, a demo or presentation space, one or more meeting rooms and a storage area. Because it is an island, every side is an entrance, which means branding, sight lines and traffic flow all have to work in four directions.
For a local exhibitor, that is a big project. For an international exhibitor, it adds extra layers:
You cannot easily walk the show floor or visit the vendor's workshop.
Communication happens across time zones and sometimes across languages and business cultures.
Show rules, labor practices and venue procedures may be unfamiliar.
Payment, currency and contract terms differ from what you are used to at home.
Problems found on site are much harder to fix when your decision-makers are asleep at home.
The key is to reduce the number of things that can go wrong and to make sure someone local is responsible for each of them.
The Cast of Local Vendors You Will Work With
Before you can manage vendors, you need to know who they are. At a typical US show, a 20x40 island involves several parties:
The show organizer. Controls the exhibitor manual, deadlines, floor plan, rules and official services.
The official show contractor. Provides services such as material handling, labor, furniture, carpet and sometimes electrical and rigging.
The exhibit provider. Supplies the booth structure, whether through a rental, a custom build or a hybrid model.
The graphics producer. Prints and finishes your large-format graphics, sometimes included with the exhibit provider and sometimes separate.
Utility and technology vendors. Handle power, internet, audio-visual equipment and lighting.
Freight forwarders and customs brokers. Move your products and materials across the border and to the venue.
Installation and dismantle crews. Build and remove the booth, often subject to venue labor rules.
When these parties are not coordinated, work overlaps, details fall through gaps and no one takes responsibility. The fewer separate vendors you manage, the better.
Strategy 1: Choose One Accountable Local Partner
The single most effective way to simplify a cross-border project is to appoint one local partner who is responsible for the booth from design through dismantle. This partner should be able to coordinate with the show contractor, manage installation, communicate with you in your working hours and solve problems on site.
A 20x40 trade show booth rental from a full-service provider is especially helpful here. Instead of shipping a large exhibit across borders, you work with a US-based company that already owns the structures, knows the venues and handles delivery, installation, dismantle and return. You only need to ship your products, samples and a small amount of branded material.
If you want an impressive island without managing fabrication from abroad, 20x40 trade show island booth rentals are one of the most practical options. You get the visibility and flexibility of an island without the logistics of building and transporting a custom exhibit.
Strategy 2: Define Communication Before You Need It
Time zones are one of the biggest hidden risks. A question sent at the end of your day may not be answered until the next morning, and by then a deadline may have passed.
Set these rules at the start:
Name a single point of contact on each side. One person at your company and one at the vendor should handle all approvals and questions.
Agree on response times. For example, same-day replies on urgent issues and 24 hours for routine requests.
Schedule regular check-ins. A short weekly call at a time that works for both sides keeps everyone aligned.
Put decisions in writing. Confirm approvals and changes by email, with clear summaries.
Use shared tools. A shared project folder or tracker with a timeline, drawings, approvals and open questions prevents confusion.
Strategy 3: Lock Down Design and Production Early
Distance makes late changes more expensive and more risky. A decision you could resolve in a hallway at home turns into a chain of emails and delays across borders.
Start with a design package that includes:
Dimensioned floor plans and elevations.
3D renders from several angles, including aisle-level views.
Material and finish specifications.
Power, lighting and technology plans.
Graphic specifications with sizes, file formats and proofs.
Then set a firm approval date. After that date, changes should come with a written cost and timeline impact. This discipline protects both your budget and your schedule.
Strategy 4: Understand US Show Rules Before You Design
Many of the problems international exhibitors face are rule-related, not design-related. Review the exhibitor manual carefully and confirm:
Island height limits and hanging sign rules.
Fire safety requirements for fabrics, carpets and materials.
Electrical standards, including voltage and plug types, and how to order power.
Labor rules, including which tasks must be done by union or venue labor.
Delivery windows and advance warehouse deadlines.
Rules for food, demonstrations, flooring and rigging.
A local partner who works in the venue regularly will know these details and can help you avoid redesigns. Always confirm requirements with the show organizer for the specific event.
Strategy 5: Plan Customs and Freight for the Items You Actually Ship
If you rent the structure locally, the volume of goods crossing the border drops, but you will likely still ship products, demo units, samples and brochures. Cross-border shipments need accurate commercial invoices, proper product descriptions and, in many cases, temporary import arrangements. Regulated products such as electronics, batteries, wireless equipment or food may require additional documentation.
Work with an experienced customs broker and freight forwarder, build in extra transit time, and confirm every delivery window. Customs and import rules change and depend on your country and products, so always verify current requirements with licensed professionals and the show organizer.
Strategy 6: Budget for the Whole Picture, in the Right Currency
Cross-border budgeting has extra traps. Exchange rates move, international payments can add bank fees, and some US vendors require deposits or payment before delivery. Include these items in your plan:
Booth rental or build costs, including design and graphics.
Show services such as electricity, internet, cleaning, rigging and lead retrieval.
Freight, drayage, customs fees and return shipping.
Installation and dismantle labor, including overtime.
Travel, accommodation, visas and staff expenses.
A contingency of roughly ten to fifteen percent for surprises and currency swings.
Ask every vendor for a line-by-line quote in US dollars, and clarify payment terms, deposit schedules and cancellation policies before you sign.
Strategy 7: Appoint an On-Site Lead
Even with a great local partner, someone from your team should be on site before the show opens to approve the finished booth, solve small problems and welcome visitors. Make sure this person has decision-making authority and a complete set of documents, including drawings, vendor contacts, schedules and approvals. A short, structured walkthrough with the installation lead before the doors open saves hours of stress.
20x40 Trade Show Booth Ideas That Work for International Brands
A large island gives you room to be creative. These 20x40 trade show booth ideas work well for companies introducing themselves to the US market:
The welcome hub. Create a bright, open entrance with a reception counter, a tall brand tower and a clear message about who you are and what you do. International brands often need to explain their story quickly to US buyers, so a simple and powerful headline matters.
The product journey. Arrange your display so visitors move through a story, from problem to solution to proof. Use zones, signage and lighting to guide them naturally around the island.
The live demo stage. Build a small stage or demo station with seating around it. Schedule short presentations every hour and promote them in advance to draw crowds.
The meeting lounge. Dedicate one corner to comfortable seating and private conversation. Serious buyers prefer to talk away from the aisle noise, and this space makes it easy to book follow-up discussions.
The local-feel touch. Add a feature that connects your home market to the US audience, such as a signature product display, a cultural element or a hospitality experience. Keep it tasteful and tied to your brand message.
The overhead statement. Use hanging signs, tall towers or a light structure to make your 20x40 trade show booth visible from across the hall. Check your show's height and rigging rules first.
Your Cross-Border 20x40 Checklist
Before you commit, make sure you can say yes to each of these:
Do we have one accountable local partner for the booth?
Have we agreed on communication contacts, response times and check-in dates?
Is the design approved, with a firm change deadline?
Have we reviewed the exhibitor manual for height, materials, power and labor rules?
Do we have a customs broker and freight forwarder for products and samples?
Is the full budget confirmed in US dollars, with a contingency?
Who is our on-site lead, and what authority do they have?
Are the booth layout and ideas built around our goals for this show?
Final Thoughts
Exhibiting abroad does not have to feel like managing a project from the other side of the world. With the right structure, one accountable partner, clear communication, early decisions and a good understanding of local rules, even a large island can run smoothly. Whether you choose a 20x40 trade show booth rental, the aim is the same: a booth that arrives on time, looks like your brand and helps you start strong relationships in the US market.


